")
I love a good challenge so, in 2023 I set out to build my own DIY patio furniture.
The problem? There was none. HAHA. Just kidding! There is always a problem in every single project of mine but… I’ll get into that in a bit.
I needed some inspo so I hopped onto Pinterest and started looking at different designs and ideas. It’s a good idea to screenshot anything that catches your eye and then give your own twist to it. And this is exactly what I did.
Spoiler Alert: Building this wasn’t as hard as I thought, and I’m here to tell you how YOU can do it too.
I’ll give you the low down on the wood you’ll need, tools I used and joinery how to’s…but most importantly… the satisfaction of saying, “I freaking did that!”
Materials – What Wood Did I Use?
The first step in any DIY adventure is gathering supplies—and boy, did I gather.
After a quick trip to Lowe’s.. Or two…or three… ok by the end of the project I had no idea how many times I really went there total but does that really matter? Let’s just say I ended up with 2x4s and 1×6 boards to build my entire furniture set. And I decided to go with cedar wood for a few reasons.
Reason number one being.. It is drop. dead. gorgeous!
Reason number two being it is perfect for holding up to outdoor elements like rain, snow, etc.
By the end of the project, I realized I probably should’ve just gone with pressure-treated wood because it’s more beginner friendly, it’s cost-effective, and it will still hold up through rain, shine, snow annnnnnd if you own a dog who is anything like mine…. It’ll even hold up to dog pee. 😉 ( Ask me how I know!)
For those who want to get fancy, though, you can go ahead and splurge on some cedar or even premium hardwood—your choice! But honestly, at that point you would be spending more money to make it yourself than you would to just buy something from a store.
HOT TIP: I wasted so much time running my wood through a planer and looking back, it was so unnecessary.
If you are someone with woodworking experience and prefer to take the extra step, go for it. If you are a beginner, I could almost bet you may not even know what a planer is.
Honestly, just skip this step. I think all I did was waste hours of my life that I will never get back.
Design – Steal My Exact DIY Patio Furniture Plans!
Yes… you can steal my exact plans I used for this project, for free! You can download them here!
But! If you use them, please please, please send me a DM with a photo of what you made! I love to see when other people tackled my creation.
And if you plan to make your own design, all I have to say is.. Good luck! LOL. Please don’t take offense to that! It’s tough!!!!
In fact the number one question people ask me is HOW did you make your own plans? And the truth is… I could carry an A+ in any math class I had in high school but I passed every other subject by the skin on my teeth. Anyway – that’s a song and dance for another time.
Long story short, I’ve thought about making a detailed step by step tutorial to teach you how to make your own plans and it is on my list for the future!
Cut List – Cut All of Your Pieces
Don’t be like me. When I first started DIY projects I would just go back and forth from making cuts, putting it together, making the next cut, putting that together, etc. WHAT A WASTE OF TIME.
Do I still do this? LOL. I would be lying if I said no. I AM type B and ADHD…
My point is… If you make a plan from the beginning , you’ll have a full cut list. Take your cut list and cut up every piece you have written down, and you will save yourself soooooo much time!
What if I forget what’s what by the time I finish cutting it all? Great question. Just label them. Write right on them.
HOT TIP: If you want to label something you don’t plan to sand pr paint – slap some painters tape on it and label the tape!
Frame It Out :
Ok let’s get to the fun part. Playing with power tools to put that thaaaang together.
I love to grow my skill level so for this specific project I tested out a few different joinery methods just because I wanted to. In fact I challenged myself to make this my first project where no screws were visible and I was shocked at the end because I was successful!!!
For the frame of the chairs I used 2×4’s because I knew they would be the most sturdy and we are chunky people over here. The amount of braces you need between the horizontal pieces will vary depending on which size chair you are making.
I just screwed all of this together with exterior decking screws without worrying about covering them up because this entire piece will be covered.
Take a Seat:
I used 1×6’s to make the seat by laying them all horizontally and attaching each end into one solid vertical piece on both ends.
Oh and, I bet you didn’t know this… dowels are the strongest form of joinery over screws, nails, wood glue, etc. I used this to join them all and it was actually super easy to use. Just line the pieces up and make a mark on both pieces for where the dowel needs to join them. Set up the jig and drill away.
If you don’t have a dowel jig or simply just don’t want to go this route, you can totally use a pocket hole jig instead. Will you see the screws? Nope! Not if you put them all on the side that’s going to be placed facing down.
A Place To Rest Your Back?
For this step – I used a biscuit joiner. Ok you caught me.. At this point It just seemed like I was doing this as an excuse to buy new power tools and jigs. Was I? The world may never know.
I used both 2×4’s and 1×6 for this. Starting by making a square to frame out the back of the seat with my 2×4’s and then spacing out some 1×6’s and attaching them all with biscuits. Not the ones you eat. I would never waste food on something I sit on.
Was the biscuit joiner necessary? No. You can use pocket holes for this too or simply just predrill and attach with screws.
Legs/Armrests
I used 2×4’s for this part. And even got a bit fancy and mitered mine with this saw.
I didn’t only miter on the end where they meet each other but also all around the pieces of the outside ends to give it some dimension and a prettier look.
You could also do this with a router. No router? No problem. Don’t know how to miter or care for that cleaner look? Again… no problem. You can skip this step entirely.
After I was satisfied with the miters, I attached each of these pieces together by predrilling with a countersink bit (these allow the screw heads to sit below the surface of the wood) and then finished screwing everything together with exterior screws. I threw some of this on top of the screws , inserted dowels and finally used this to trim the excess off.
Assembly – Putting Together Your DIY Patio Furniture
I advise attaching the 2×4 base to the legs first. Just trust me.
Once you have that done, you can attach the seat to the top of the base and then attach the back to the inside of the arms/legs.
Again, I did all of this with exterior screws making sure to pre-drill with a countersink bit first.
Finishing Touches
If you chose pressure treated, be sure to paint it. Buuuuuttt make sure you wait a bit to allow it to sit in the sun and dry out before painting.
And you aren’t gonna like this, but hear me out… You really should seal your paint with this. Yes I know it is expensive but it is my absolute favorite sealer especially for things that I leave outside. My grandpa always used it and grampas know everything…
Since this is a DIY patio furniture set, it didn’t exactly come with cushions. And cushions can be expensive so I advise checking FBMP for some first. I have also heard it’s much cheaper to just buy foam and then waterproof cushion covers separately and put them all together yourself. If you want my exact seat cushions you can find them here.
HOT TIP: If you’re worried about your sealer leaving a yellow hue on top of your paint just throw some of your paint in it and mix it before using it. This will tint it closer to the color of your choice.
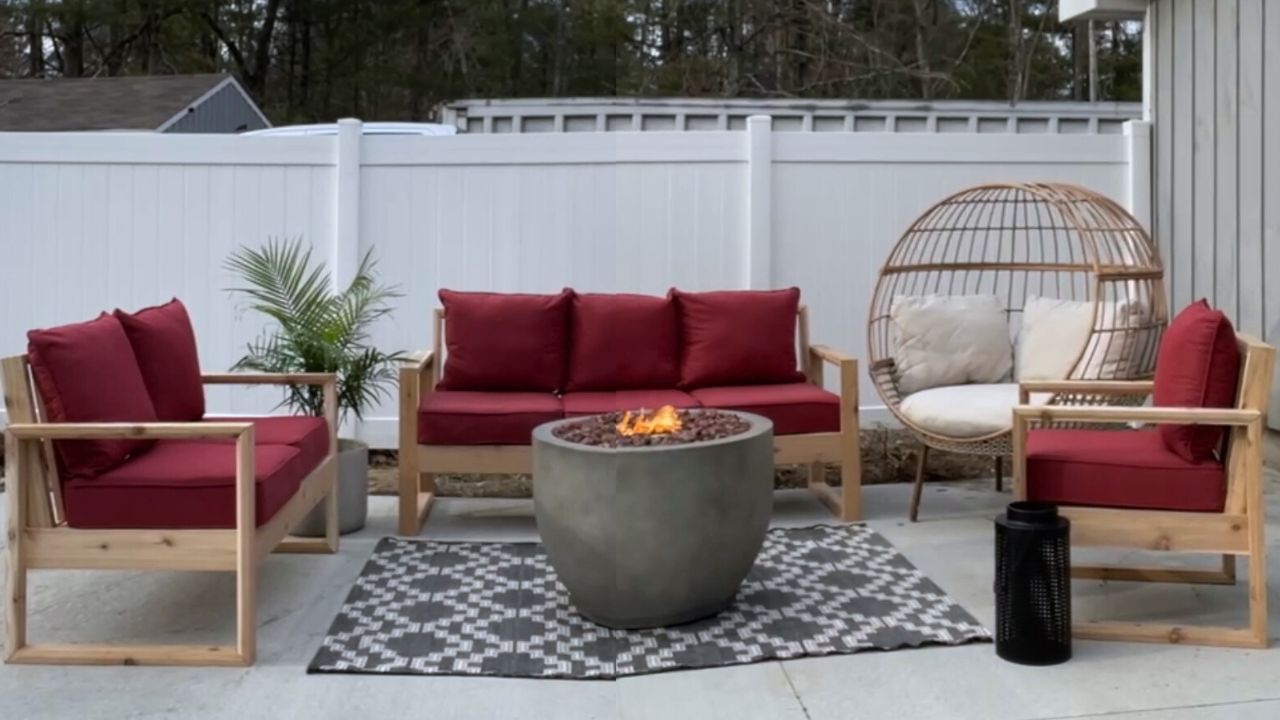
I Actually Built My Own DIY Patio Furniture!… (And So Can You!)
I actually cannot believe I pulled this off and I am BLOWN. AWAY. at how pretty it is.
When I was searching for patio furniture inspo, I had to finally call it quits and just stop looking at things. For some reason, my mind always wants MORE. It’s an ugly personality trait that I am working on kicking to the curb.
Like I originally planned on going with pressure treated but once I saw a set that was made out of cedar I was sucked in immediately. This is the problem I mentioned in the beginning. If you’re wondering how that’s a problem, ask my wallet.
I literally could have made my set for about ⅓ of the cost that I actually spent if I had just stuck to pressure treated and didn’t go for cedar from the beginning.
Looking back now, I am happy I went the route I did. It is gorgeous, sturdy and the quality beats any store bought furniture ever. Plus, I now have bragging rights for every BBQ and family gathering for years to come. And let me tell you, I do brag. LOL.
If you want some bragging rights too, don’t forget to download my FREE plans for the patio sofa!
And remember, the best part about DIY is the sense of accomplishment and confidence you get with every project. Don’t be afraid. Just pick it up and go! And you might even find your backyard filled with your own DIY Patio Furniture!
For more DIY projects and inspiration, don’t forget to check out the rest of the blog!
Watch On YouTube!
DIY
Storage
DIY


binge the favorites
SHOP ALL FAVORITES →
Could Not Function Without This Digital Lifesaver...
Literally Would Live in a Pigsty Without This ...
I Wear These
( Almost ) Every Day...
sanity savers
Follow AlonG ↓
I’m all about keeping it real with my hair a glorious mess, rocking my favorite sweats, and ready to share it all...
the good, the challenging, and the downright ridiculous.

Leave a Reply