")
My friend wanted to surprise her mom with a cozy staircase makeover for their unfinished basement steps. The thing was… this makeover really needed to be on a budget. Luckily, budget friendly DIY projects are kinda my thing!
Since it was just her basement stairs, I upgraded them with a regular rug runners annnnd did it all in under eight hours, using basic tools and a sprinkle of patience.
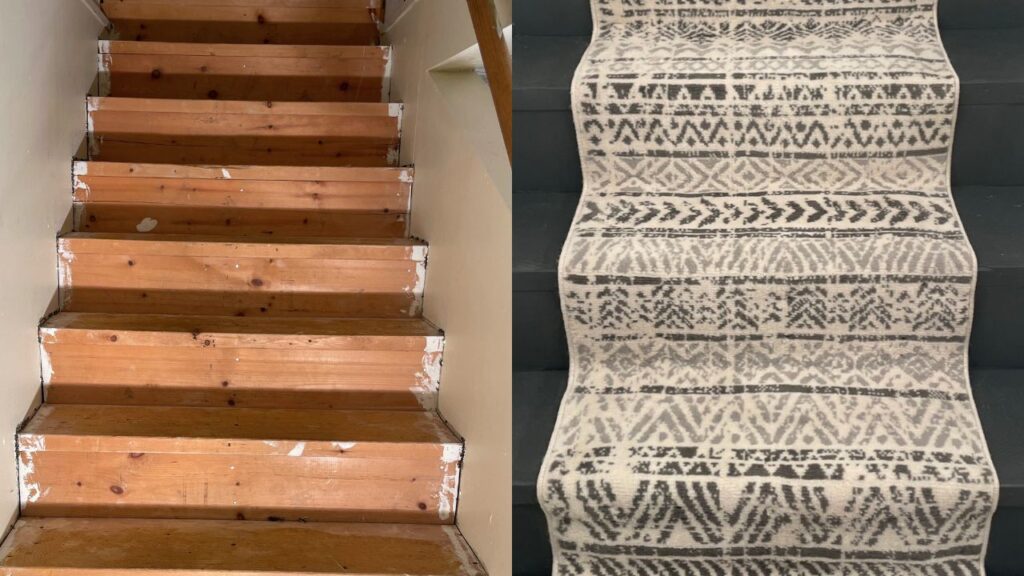
Here is how I turned these drab and unfinished steps into a warm, functional, and stylish part of their home. Oh…. and how you can totally do this too!
Tools & Supplies
Before diving in, here’s a complete list of everything I used for this project:
- String (yarn or kitchen twine works too, to easily measure the length you’ll need for the runner)
- Measuring tape (to measure the string and stair dimensions)
- Two rug runners, each slightly longer than half of the stair length
- Rug pad (optional for cushion)
- Paint
- Paintbrush or small roller
- Staple gun (this one was way easier with the power behind it but you can use a regular one instead)
- Scissors (DONT try using regular ones, trust me these are worth the money)
- Pencil (for marking centerlines and pad placement)
STEP 1: Measure & Mark Your Stairs With String!
Why string? Because it’s so much faster and requires less effort. It completely eliminates having to wrestle the tape measure while bending it over each step.
- Unravel your string from the first stair tread to the top—vertical rises and horizontal steps included.
- Trace the path
- Use your measuring tape to get the total length from the string. Add 2–3 inches extra per run.
STEP 2: Order Your Rug Runners
Once you have your measurement for the stairs from your string, divide the total length of the stairs by two. I found the cheapest way to cover the distance was to order two runners slightly bigger than that measurement for wiggle room.
The most fun part of this project is choosing a cozy stair makeover theme—pattern or neutral—so it complements your basement vibe. We went for something clean with black and white with a fun modern pattern!
STEP 3: Prep the Stairs and Paint
While you are waiting for your runners to be delivered, you can go ahead and prep your staircase by;
- Cleaning the stairs.
- Marking where the edges of the runner will lay.
- Applying two coats of paint on the outer edges, letting dry between. (this allows you to still walk down the center of the steps if you need to access the basement while the paint is drying)
STEP 4: Cut & Staple The Rug Pad (Optional)
- Cut the rug pad slightly smaller than the width of the rug you bought so there is no chance of seeing the pad.
- Staple the rug pad every few inches along edges to make sure it is nice and secure.
- Make sure to smooth out the rug pad; it shouldn’t buckle under your feet.
STEP 5: Install the First Runner
After pad’s secured:
- Lay the first runner starting at the back of the first step ( at the bottom of the staircase) . You can start it on the first riser that leads to the flooring if you want but I thought that looked awkward.
- Staple along the inner corner underneath the step where it meets the top of the riser and at the crease where the back of the step meets the bottom of the riser.
- Press corners and tuck under the stair nose for a clean look.
STEP 6: Install the Second Runner
Time to install the second rug runner with the goal of making the seam between the two runners completely disappear.
- Fold the end of the first runner over and end it under the step right at the top of the next riser. Align the next runner at the top of the riser right where the first rug ended.
- Staple generously in every crease.
- Go slow. I had a crooked seam at one point which meant I had to pull it up and re-staple. But it’s definitely better to take that time to fix it than have a wavy ridge that will cause tripping hazards.
STEP 7: Finishing Touches & Safety Check
Can you believe that you are almost done now? I told you it wasn’t that hard! Here are the final touches and checks I did to make sure this runner looked as good as possible and wouldn’t cause any tripping.
- Trim any excess at the bottom. Tuck it the same way you did with the first runner and staple it in place.
- Fold edges slightly under—neat and safe.
- Double-staple high-traffic edges.
Bonus Hot Tips
- Measure twice, cut once.
- Color-coordinate pad and runner for discreet lines— ex. tan pad under beige runner.
- Staple gun care: unplug, empty staples after, store away from little hands.
- Keep a paint pen for touch-ups when dings appear.
FAQ’s : Frequently Asked Questions
Q: Can I use only one runner instead of two?
A: Yes—but you’ll need one super long one and I found these were much more expensive than just buying two of the normal length ones.
Q: Does the paint wear off fast on risers?
A: Not really considering it’s on the sides of the stairs where you’re not stepping.
Q: How thick should the rug pad be?
A: I used a ¼″ pad. Any thicker can elevate the runner too much.
Q: Can I skip stapling and use adhesive tape?
A: Double-sided carpet tape might work but can peel paint or leave residue. Staples are secure and safe.
Q: What if my stairs are uneven height or width?
A: Measure each tread individually. You may need to cut the runner slightly on certain steps—no one’s perfect, even your stairs.
If you loved this project and want to see more like it, you can binge the blog for more budget friendly DIY inspiration! See you over there!
DIY
Storage
DIY


binge the favorites
SHOP ALL FAVORITES →
Could Not Function Without This Digital Lifesaver...
Literally Would Live in a Pigsty Without This ...
I Wear These
( Almost ) Every Day...
sanity savers
Follow AlonG ↓
I’m all about keeping it real with my hair a glorious mess, rocking my favorite sweats, and ready to share it all...
the good, the challenging, and the downright ridiculous.

Leave a Reply