")
Don’t get me mistaken with someone else… I do NOT have a green thumb.
Buuuuut one of my good friends DOES and she asked me to make her a garden trellis so that she didn’t have to buy one for a whopping $200. So you know that’s what we are gonna do!
Getting Started…
Grab your leftover lumber. ( Leftover lumber is the key to how I saved so much money on this one!)
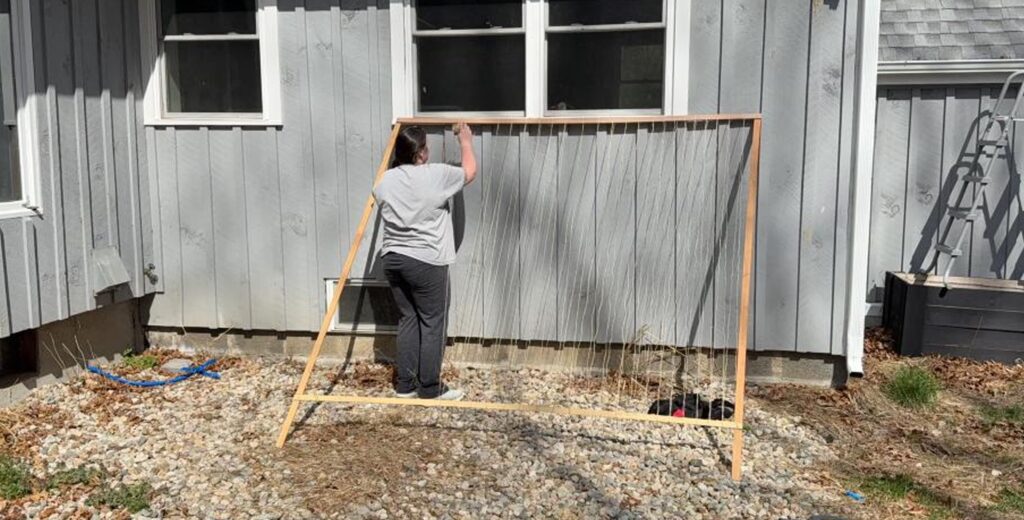
The materials I chose were thin and prone to being knocked over by the wind but I added some extra supports to keep it up and survive the wind, rain, etc.
If you’re anything like me (resourceful, brilliant… tired), you have a pile of wood from past projects that your spouse has repeatedly suggested you get rid of. I’m proud to say that hoarding finally paid off.
I had leftover 1×3’s and 1×2’s from my fireplace project. These boards had been ripped down so thin they were about 0.3 inches thick. Basically delicate enough to snap if you looked at them wrong, but still useful enough for a trellis if you believe in yourself and screw them together hard enough.
Building The Frame…
I grabbed my slats of wood and made a square frame. No mitered corners, no fancy brackets. Just good old-fashioned “eyeball it” craftsmanship and screwed it together with this.
HOT TIP: Try not to screw it into your picnic table. Unless you like surprise remodeling projects… and yes, I totally did this. OOPS.
V is For Victory…
Now, a trellis needs to stand tall and proud in the garden. But to get it to do that, I needed to make sure the legs could be pounded into the ground. So, I grabbed my trusty jigsaw and cut a V-shape on the bottom ends of two of the frame legs.
Twine Time …
Now came the weaving. I took some good ol’ jute twine—nothing fancy, nothing organic, just twine that was sitting in the garage looking guilty—and started wrapping it around the frame.
Up and down. And again. And again. So much twine. Eventually, I covered the entire trellis from side to side, top to bottom, in beautifully chaotic strands of twine. The result? A lattice-esque grid perfect for peas, beans, or anything else that climbs with less drama than my children.
When I Realized….
I stood back to admire my work when it hit me:
This thing is totally going to blow over in the wind.
Cue the panic and a dramatic trip to the garage. I found some beefier wood scraps—actual structural wood, it was leftover from when the siding was done on our house. I cut more V-shapes (because I’m nothing if not consistent), pounded those into the ground behind the trellis, and then screwed the trellis frame directly into them.
But I Didn’t Stop There …
Was I done? Did I walk away in triumph? No, my friends. I tied that sucker to the fence with string. The wind may howl, the kids may climb, and the dog may pee on it, but this trellis? It’s not going anywhere.
Victory? You Be The Judge...
Is it the most beautiful garden trellis in the neighborhood? Depends. If you’re asking the Pinterest moms, probably not. If you’re asking the climbing plants? Absolutely.
Here’s what I love about this project:
- It was practically free. All leftovers, baby!
- It’s solid. Held together with twine, screws, hope, and a little bit of stubbornness.
- It’s imperfect. Like me. Like all of us. But it gets the job done.
Bonus HOT Tips : For Other DIY Moms Attempting This Madness…
Measure before you screw.
Unless you like unscrewing things in 90-degree heat while your toddler narrates, measure twice , screw once.
Jigsaw safety!
V-cuts are fun. Cutting your extension cord with this bad boy is not.
Don’t overthink the twine.
Your plants don’t care if it’s symmetrical. Just give them something to grab.
Anchor everything.
Because wind, raccoons, children, etc.
Own your mess-ups.
Screwing it to the picnic table? That’s just a signature move now.
Now It’s Your Turn…
If you’ve got some scrap wood, some twine, and a handful of screws leftover, you can make this DIY garden trellis.
It’s functional, it’s fun, and it might just be the beginning of your next backyard obsession.
Pound that wood, wrap that twine, and make something glorious for your garden. And if you accidentally attach it to your outdoor furniture along the way, just smile and say, “It’s part of the charm.”
And for more DIY projects… keep reading the blog!
Watch on YouTube!
DIY
Storage
DIY


binge the favorites
SHOP ALL FAVORITES →
Could Not Function Without This Digital Lifesaver...
Literally Would Live in a Pigsty Without This ...
I Wear These
( Almost ) Every Day...
sanity savers
Follow AlonG ↓
I’m all about keeping it real with my hair a glorious mess, rocking my favorite sweats, and ready to share it all...
the good, the challenging, and the downright ridiculous.

Leave a Reply