")
I was DONE tripping over little shoes and I knew there had to be a way to create some really functional shoe storage in our tiny mudroom/ entryway.
Our mudroom, which is really more of an entryway has three doors (because why not?), zero closets, and no floor space left for a traditional shoe rack unless I wanted to start vaulting over it to get to the kitchen.
Because of this, my current shoe storage solution was baskets. But my kids are all really young and its easier for them to dump the entire basket of shoes than to dig through it to find a pair. So the shoes were basically never actually in the baskets.
So finding another shoe storage fix was wayyyyyy overdue! Lemme show you the genius ( if I do say so myself! ) way I found to store our shoes in our small entryway!
Spoiler alert: It works like magic, looks better than you’d expect, and even my kids think it’s fun to use — which basically makes this DIY a parenting win, too. It’s even hidden from guests since the entry door covers it when it opens.
Everything I Used:
Optional:
STEP 1: Plan & Measure
First things first, accept that your space is weird. For example; ours has:
- The front door
- The basement door
- The door to the kitchen
- And maybe 12 inches of free wall space between all that chaos, that’s it.
Using your measuring tape and some painter’s tape, mock out where your hooks will go.
Before you do this though, you should grab the biggest shoe that you plan to hang there and test it against the wall for an idea of spacing.
Once you’ve planned spacing with the biggest shoe, mark all of the spots with the measuring tape and painters tape. Make sure you actually open and close all the doors around it while the tape is in place to avoid the visual for when the doors are open.
HOT TIP : I strategically stopped the shoe hooks where the end of the door swings open so they wouldn’t be seen when walking in!
STEP 2: Choose Your Hooks Wisely
Here’s the brilliance of it all: double hooks.
These are the ones I used. They are budget friendly and the best way to hang pairs together on the wall.
STEP 3: Mount the Hooks
Once you’ve got your spacing, it’s time to attach those hooks.
I used:
- Cordless Drill
- Screws that came with the hooks
Consider pre-drilling pilot holes with a smaller bit first. It makes it so much easier.
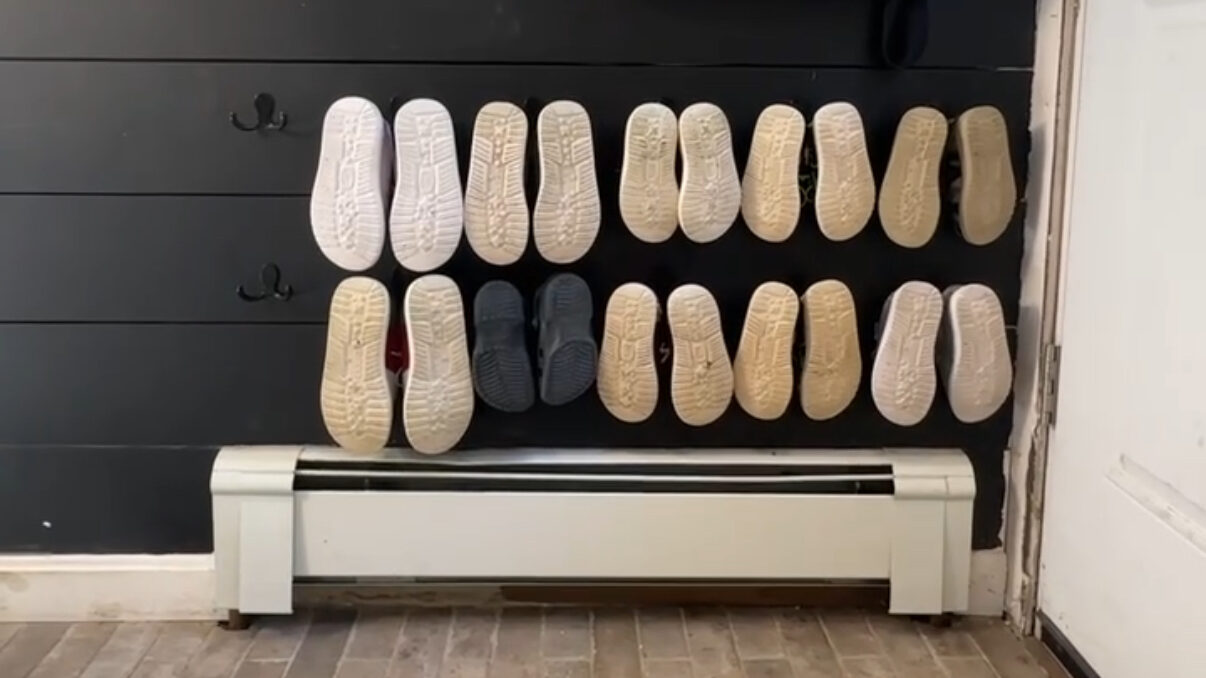
STEP 4: Hang the Shoes (Yes, Like Art)
And lastly…
Hang each shoe by the heel loop or just prop the toe over the hook. Surprisingly, even Crocs stay in place if you wedge the back strap on the top hook. (Who knew?)
BONUS IDEA: Label each hook with name tags, washi tape, or labels so everyone knows whose is whose!
Listen, no one is going to mistake my mudroom for a designer showroom. But this project turned a tiny, dysfunctional corner of my home into a high-functioning shoe storage zone — all for the price of a few cheap hooks.
Whether you’ve got toddlers with tiny sandals or teens with size 12 basketball shoes, there’s a way to make this project work for you. Modify it, expand it, slap some stickers on it, whatever you need to do.
If you try this project out for yourself I would love to know how it goes! Share it with me in the comments below!
And for more DIY home project ideas, keep on binging the blog!
DIY
Storage
DIY


binge the favorites
SHOP ALL FAVORITES →
Could Not Function Without This Digital Lifesaver...
Literally Would Live in a Pigsty Without This ...
I Wear These
( Almost ) Every Day...
sanity savers
Follow AlonG ↓
I’m all about keeping it real with my hair a glorious mess, rocking my favorite sweats, and ready to share it all...
the good, the challenging, and the downright ridiculous.

Leave a Reply