")
When I decided to tackle my master bathroom reno, I bounced back and forth trying to choose the style of the mirror.
Despite what you may think.. I’m no DIY expert. Mounting things on walls ALWAYS ends with me regretting my life decisions and having a few major meltdowns. So I obviously thought it was a great idea to go for the one massive mirror over two smaller mirrors.
My next best decision? I’ll just hang it by myself. What could go wrong?
Spoiler alert! lots of things could go wrong, but with a bit of patience (or none) and some humor I pulled it off.
Lemme walk ya through just how I did it while sharing some top secret tips for you as a beginner DIYer.
Mirror Choice – Did I Make The Right One?
Let’s just get this out of the way real quick.
I just turned 30 years old a few weeks ago. I am a bougie girly if you will.. I’ve had champagne taste since I came out of the womb in 1995. It’s taken me thirty years but I have finally realized that functionality needs to come before aesthetics. Most of the time that also means projects will run me much less money too.. My wallet loves that for us. CHA CHING!
Since my “master bathroom” is on the smaller side, I figured a single large mirror would not only make it feel more spacious but also save me a bit of cash. I looked at two smaller mirrors, but when I did the math, I realized it was going to cost me double what I would spend on a big one. Meh. No thanks.
Obviously I chose one giant mirror for this reason and the price is honestly mind blowing.
HOT TIP : pick a mirror that fits your style, space, AND budget. If you’re not sure where to start head to a few home improvement stores like Lowe’s or Targét and take note of what catches your eye. Bougie Biatch like me? I just learned about this hack recently… if you fall in love with something but it’s way out of your budget – don’t even fret sis. Pull up google and take a pic of the item and throw it in there. You’re guaranteed to find dupes of the item for LESS!
Preparing the Wall (and Yourself Mentally)
Before you even think about putting a hole in the wall, take a minute to prepare yourself (because trust me, things will get chaotic).
Some people think I do things a** backwards but I always have a reason behind them. Hanging my mirror before my wallpaper (code ‘bylex25‘ gets you 25% off btw!) probably makes no sense to you but… I’m not perfect and neither is my stud finder.
I tend to let the stud finder lead the way and then I use a tiny drill bit to go through the drywall and make sure it is actually is a stud. The problem is sometimes it ain’t. That’s why I recommend using this stud finder instead of one like mine.
Swing and miss.. I had like 5 extra holes that were unnecessary right off the bat. I knew my wallpaper would hide these mistakes so I had no problem taking the mirror down only to have to rehang it after hanging the wallpaper.
Use The Right Tools
When it comes to hanging anything heavy (like my giant mirror) you have to find the studs in your wall. K you don’t HAVE to but I’m not gonna lie I just don’t trust wall anchors to hold something this heavy. I used a stud finder, which makes the whole process easy.
Only thing that would’ve made it easier? Using a magnetic stud finder instead of one like mine . This will grab hold of the screws in your drywall (the drywall is attached to the studs of your walls with screws) so you are guaranteed a stud every time.
Don’t Trust the “Free” Hardware
I never expect the included mounting hardware to be top-notch with any product I buy. Companies will cut cost where they can and unfortunately that generally happens with the hardware every single time.
The cleat they provided with my mirror only had 3 or 4 holes predrilled into it. This obviously wasn’t going to line up with the studs in my walls. They did send anchors too but.. That’s a no from me, dawg.
I decided to take a trip to ace hardware but they didn’t have any cleats the size I needed. I headed to Home Depot and that’s when disaster struck…
I thought I had killed the transmission in my brother’s car. I pulled out of my street and the car just stopped accelerating. I was convinced I would have to sell my kidneys to pay for a new transmission. I ended up turning around and just going home and then it dawned on me.. I didn’t need a new cleat, I just needed to drill new holes in the one I had.
If you’re too nervous to do this I suggest just buying this from the beginning. It has so many more holes in it – it is definitely going to hit a stud or two or five.
HOT TIP : This might sound like overkill, but trust me: it’s always better to be safe than sorry. If the hardware only comes with two screws and you’re dealing with a heavy mirror, use four. Extra screws won’t hurt, and they’ll ensure your mirror stays put. Always use more screws than you think you need.
X Marks The Spot
It doesn’t always have to be perfect… except for when you’re hanging something on the wall. It does in fact need to be perfectly level.
If you want to avoid a crooked mirror that’ll bug you forever ( I speak from experience with the one hanging in my hallway ), you need to measure 9 times and mark once. After marking the studs vertically just throw a level up on the wall and mark one continuous horizontal line.
Don’t Miss..
This can be extremely nerve racking especially if you’re working in a bathroom or kitchen.
Not only are you playing around in a place that there is electrical present but there’s lots of water running through the walls too.. And honestly it’s like you’re working blindly in this situation.
If you’re nervous, start with a smaller drill bit then go for the big guy when you’ve confirmed you didn’t hit anything. Just make sure you’re drilling into studs—not just the drywall. Drilling into drywall without support is useless.
HOT TIP: If you don’t own a drill, you’re going to want to get one. If you’re confused on what to buy first and don’t want to spend lots of money right away, choose a drill first. An impact driver is great because of the torque it provides but a drill can drill pilot holes AND drive screws.
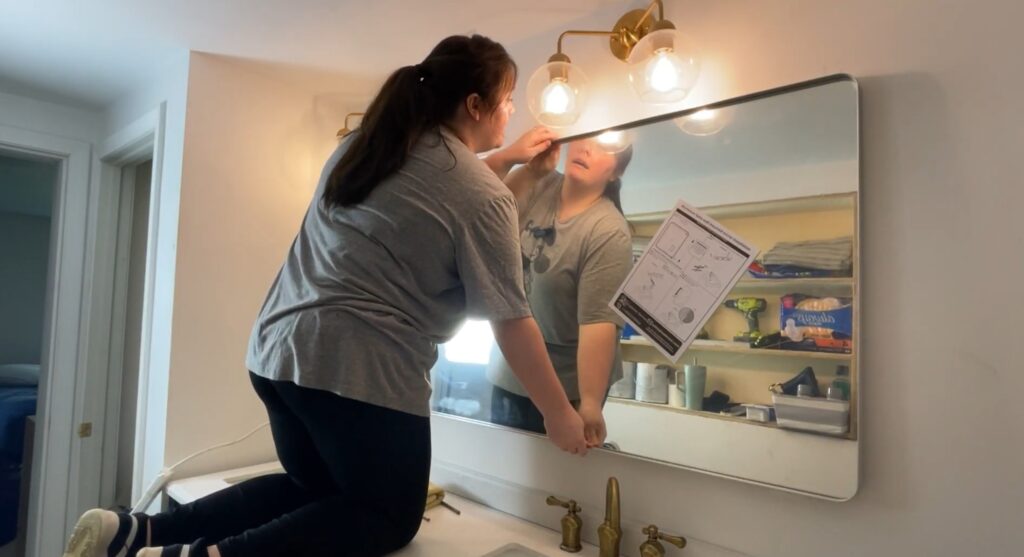
Hang ‘Er Up!
Now comes the moment of truth: getting the mirror up on the wall.
If you’re doing this solo, like me, congratulations you’re a super star.. but you might need a little bit of extra muscle. I heaved this huge thing up onto the cleat and then slid it side to side until it was perfectly centered.
The beauty of a cleat system is that you can shift the mirror left or right to fine-tune its position, so don’t panic if it’s not exactly perfect the first time.
*Hair Flip*
You did it sis!!! Step back and admire it!
I am so happy with the design and style choice I made and seriously this thing was a steal of a deal!! It instantly made the space feel larger and brighter. I do have one issue and that would be that the mixed metals in the bathroom are not my style. I am not going to jump and buy new things just to change the color so I’ve considered spray painting the faucets and lights.
Stay tuned here on the blog for my next bathroom update.. There’s still so much to do. 🙂
P.S. A few weeks later I destroyed my brother’s car again. Or so I thought… I was trying to change the radio station and suddenly the car would not go past 15 mph. Apparently, I was hitting a button that put the car in manual mode… not changing the radio station. OOPS!
Watch On YouTube!
DIY
Storage
DIY


binge the favorites
SHOP ALL FAVORITES →
Could Not Function Without This Digital Lifesaver...
Literally Would Live in a Pigsty Without This ...
I Wear These
( Almost ) Every Day...
sanity savers
Follow AlonG ↓
I’m all about keeping it real with my hair a glorious mess, rocking my favorite sweats, and ready to share it all...
the good, the challenging, and the downright ridiculous.

Leave a Reply